






Photos are a major part of the profile pages on all the major social media sites. There are profile photos (usually your picture) and header or cover photos (the big photo that usually appears across the top of your profile or homepage).
As these photos play a big part in making a good impression with people, you want them to look good. But making this happen can be frustrating. Sometimes the photo you post will be scaled to fit in the allotted box with the result that the contents look blurry or distorted, and sometimes parts of a picture are cut off. On other occasions important parts of your cover photo are hidden behind your profile picture.
How do you prevent these problems? It is very easy – simply post photos that match the  dimensions for the particular type of photo you are posting. But every social media site is different – how do you remember all these dimensions? Use the handy infographic posted on the Mainstreethost blog: the Social Media Image Size Cheat Sheet gives you the dimensions for the various photos on the various social media sites. It even gives you the dimensions for the parts of a cover photo that will be hidden behind a profile picture. Before you post a picture, use a photo editor to resize and/or crop it to the appropriate dimensions and it will display exactly the way you want it to.
All Our Technology Tips
Use Proper Dimensions to Make Photos Posted on Social Media Profile Pages Look Better

Create an if Found Lockscreen Message on Your Portable Devices
I know your smartphone and iPad already have their device access passwords enabled (meaning anyone picking up your device can’t access the information on it without punching in a password). And if they don’t – sit down right now and turn the access  password on. Otherwise the information on the device is accessible to anyone that happens to find it. If you are a lawyer and you have client information on the device, this is a critical step for protecting the confidentiality of client information.
But what happens if someone finds your device? Will they be able to figure out who it belongs to?
You could go the old-fashioned route and put a physical label with your name and number on it, but there is an easier way.
The operating systems on most devices have a configurable message on their lockscreen. If you go into your device’s settings, you will most likely find a place that you can enter your name and phone number. This info will appear on the screen when your device is locked. No, it won’t guarantee you will get your device back if it is lost. But there are honest people out there and it could help.
Protect Your Smartphone or Tablet With a Good Case
It takes just one accidental drop to kill an iPad or smartphone.
And unfortunately, if the glass cracks, they are difficult or even impossible to repair. To prevent this from happening you want to protect your device with a good case. But there are cases and there are cases. Pretty but flimsy plastic cases will do little to protect your device if you drop it. You need to invest in a good case.
I really like OtterBox cases. Otterbox makes cases  for iPhones and iPads, as well as Samsung, Motorola, LG, HTC, Nokia and even BlackBerry phones. They have several lines of cases that offer various levels of protection. They are very well designed and are super-reasonable in price, often the same or only slightly more than many of the junk cases out there. While some OtterBox cases have a screen protector that is integrated in the case, many also come with a standard stick-on screen protector.
For general use I like the cases in the Commuter line. They are reasonable sized and give you 2 levels of protection, a hard outer shell and a silicon liner to absorb an impact. The Preserver series will keep your device dry. The Resurgence line includes a 2,000 mAh lithium ion battery. The Defender series is big and clunky, but will protect your device from just about anything. There are other series as well, and they also make dry boxes.
You can and they are available at many retail stores.
Be a Dropbox Wizard With These Keyboard Shortcuts
Regular readers of the Tuesday Tech Tip will know I get excited about keyboard shortcuts. This week I want to cover some of the keyboard shortcuts that are available in Dropbox. 
Although most of you will be used to navigating Dropbox with your mouse, you can actually do many things with keyboard shortcuts. It is worth your time to learn these keyboard shortcuts as you will be able to complete common tasks more quickly than you would if you were using a mouse. Here is a list of some handy Dropbox keyboard shortcuts (Mac users please substitute the Command key for Ctrl):
- Cursor Up will select the previous file (hold Shift at the same time to select several files)
- Cursor Down will selected the next file (hold Shift at the same time to select several files)
- Ctrl+a will select all files
- Cursor Left will move up a folder level
- Cursor Right will open a folder
- / will search
- Enter will download or open the selectedfile
- Ctrl+c will copy the selected file(s)
- Ctrl+v will paste the selected file(s) into the current folder
- Ctrl+c will copy the selected file
- F2 to rename a file
- Delete to delete the selected file(s)
- Ctrl+z to undo the most recent move, copy rename or delete
And if you can’t remember all these shortcuts, just remember pressing ? will display them for you.
Use Hidden Level App on Your iPhone to Hang Pictures
You can never trust your eye  when it comes to hanging pictures or other similar situations when things have to be level. But no need to run to the toolbox – just grab your iPhone. Open the Compass app, swipe to the left and bingo, you have a handy level that will help you hang a stubborn picture that just doesn’t seem to want to hang correctly on the wall.
Canadian Weather Radar Will Answer the Question: Will It Rain Today?
Predicting the weather is both an art and a science, and getting it right in the longer term can involve some luck. But in the shorter-term, knowing for sure whether some rain is coming your way can be very helpful. Should I head to the golf course? Is my kid’s baseball game going to get cancelled? Do I take an umbrella for the walk to the subway?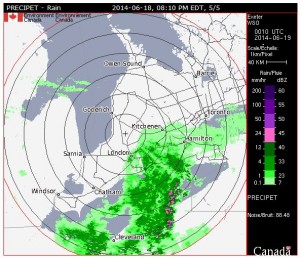
My go-to resource for answering these kinds of questions is Government of Canada Canadian Weather Radar page for Ontario. It has a map of Ontario overlaid with current storms and links to more detailed maps for each of the radar stations in different parts of Ontario.
There is also a page which shows a map of the entire country overlaid with radar images of current storms and links to 31 radar stations.
If you look at any individual radar station map, you can even gauge how fast the rain is coming your way by hitting the “play” button to see the movement of the storm in 10 minute intervals over the last hour.
There are various other weather resources Canadian Weather site, but I find the radar pages to be the most helpful ones. And remember, you can get updates wherever you are with the browser on your smartphone.
What to Buy – Free Advice on Current Specs for PC and Mac Desktops, Laptops and Servers
As a supplement to their great book, the 2014 Solo and Small Firm Legal Tech Guide  (published by American Bar Association), my good friends Sharon D. Nelson and John W. Simek will share their take on the best current PC or Mac hardware options for desktops, servers or laptops. To get this informative document, simply send an email to [email protected] requesting the “current specs.”
Thanks Sharon and John for this very helpful resource!
Using Two Monitors Will Help Get More Work Done and Save Money
On many occasions over the years I have written and spoken about the benefits of using two monitors in a law office setting – for both lawyers and staff.
Once you try two monitors, you will never go back. Having two monitors makes the preparation of documents, particularly complicated legal documents, much easier. When you can have the document you’re drafting on one screen and your legal research  results on the other, it becomes a snap to cut and paste text directly from one to the other. Turn one of the monitors ninety degrees (“portrait” orientation). This allows you to view a complete page of a document at normal size without squinting. You could also use a second monitor to monitor your email.
And beyond making your drafting easier and faster, you will find you will save money as you will be printing less.
Unless your computer is truly a dinosaur, it’s pretty much plug and play to add that second screen. Even most laptops will easily accept a second monitor when you go into your display settings and select that option.
Monitors are fairly inexpensive to start with today, and you can save even more money if you buy a second monitor as part of the bundle when you buy a new computer.
Make the switch to two monitors – you will never look back.
Use Control+F or Command+F to Find Specific Terms on a Webpage
Slowly scrolling through a webpage to find a specific term is not the most efficient or fastest way to find the location of the information you are looking for, especially if the page is a long one.
One simple keyboard shortcut can help you instantly find the location of specific terms on a webpage. Use Control+F on a PC  or Command+F on a Mac to find specific terms on a webpage. Press this shortcut, enter your term in the search box, hit Enter and you will instantly jump to the first location of that term. Look for arrows next to the search box that will allow you to jump forwards or backwards to the next occurrence of the term you searched for.
Make Your LinkedIn Presence Look More Professional With a Vanity URL
When you create a profile on LinkedIn, the default URL LinkedIn creates for your profile page will end with a jumble of letters and numbers. Yuck!
You can make your profile look more professional and have a profile URL that is easier to remember and share by claiming your own LinkedIn vanity URL. It will look like this: www.linkedin.com/in/yourname. 
You can customize your public profile URL when you edit your public profile. Follow these steps:
- Move your cursor over your picture icon (to the left of the Share an update… box) and click on it. This takes you to your Profile page
- At the top of your Profile page and select Edit Profile
- Click the Edit Profile button under your profile photo and details
- Click on Edit which appears next to your current public profile URL
- Scroll down a bit and in the Your public profile URL box that appears at the bottom right of the right column, click on Customize your public profile URL
- Type the last part of your new custom URL in the text box
- Click Set Custom URL
And here are few more tips about what can and can’t be in a LinkedIn vanity URL:
- Custom public profile URLs are available on a first come, first served basis.
- Your custom URL can have between 5 – 30 letters or numbers. Do not use spaces, symbols, or special characters.
- You cannot change your URL more than 3 times in 6 months. If you’ve already done this, you’ll have to wait 6 months before you can change it again.
- Some URLs may be unavailable. If you use a URL and then change it, the URL you first chose will be unavailable for use by another LinkedIn user for several months. If the URL you want isn’t available, you will need to select a different one.


